Need Full Specifications?
Download our 2025 Product Catalog for detailed drawings and technical parameters of all switchgear components.
Get CatalogDownload our 2025 Product Catalog for detailed drawings and technical parameters of all switchgear components.
Get CatalogDownload our 2025 Product Catalog for detailed drawings and technical parameters of all switchgear components.
Get Catalog
Follow this distribution transformer testing checklist for engineers to ensure safety, reliability, and compliance with industry standards in every test.
You face many challenges when you test transformers in the field. Distribution transformer testing means checking a transformer’s condition, performance, and safety before you energize it or after it has been in service. You help prevent failures and protect people and equipment by following a systematic approach. Many engineers follow standards such as IEEE C57.12.00 for liquid-immersed units and IEEE C57.12.01 for dry-type models. The table below lists common standards you may use:
Standard | Application |
|---|---|
IEEE C57.12.00 | Liquid-immersed distribution transformers |
IEEE C57.12.90 | Power and regulating transformers |
IEEE C57.12.01 | Dry-type distribution transformers |
IEEE C57.12.91 | Power transformers for dry-type |
Understand the importance of distribution transformer testing to ensure safety, reliability, and compliance with industry standards.
Always perform a thorough visual inspection before electrical tests to identify potential issues like physical damage or oil leaks.
Conduct essential electrical tests, including winding resistance and insulation resistance, to detect hidden faults and confirm transformer health.
Regularly analyze transformer oil to monitor for gases, moisture, and dielectric strength, which can indicate internal problems.
Follow a systematic test sequence to ensure no steps are missed, starting with visual checks and ending with functional tests.
Document all test results accurately to track transformer condition over time and support maintenance decisions.
Prioritize safety by wearing appropriate personal protective equipment and assessing the testing site for hazards.
Stay updated on best practices and industry standards to enhance transformer testing effectiveness and maintain grid reliability.
You need to understand why distribution transformer testing matters before you begin any work. This process checks the health, safety, and performance of transformers in your network. You use these tests to find hidden faults, measure insulation strength, and confirm that the transformer meets industry standards.
Tip: Always check for dielectric strength. This test helps you prevent dangerous failures and ensures the transformer can handle high voltages safely.
International standards highlight several main objectives for transformer testing. The table below shows what you aim to achieve:
Objective | Description |
|---|---|
Ensuring Safety | Testing helps prevent fire hazards, oil explosions, and electrical accidents caused by undetected faults. |
Operational Reliability | Early detection of defects to avoid catastrophic failures and minimize downtime. |
Compliance with Standards | Ensures adherence to IEC and IEEE standards, which is often legally required for safety audits. |
Cost Reduction | Enables condition-based maintenance, reducing maintenance costs and extending transformer lifespan. |
Grid Stability | Supports voltage regulation and prevents issues that could lead to grid instability. |
You will perform several types of tests during distribution transformer testing. These include visual inspections, electrical tests, oil analysis, and functional checks. Each test gives you important data about the transformer’s condition.
When you follow a systematic approach to distribution transformer testing, you gain many advantages. You can spot insulation problems early and plan maintenance before a failure happens. This saves you money and keeps your network running smoothly.
You gather data on insulation resistance and oil quality, which helps you make smart maintenance decisions.
Regular oil analysis lets you monitor the health of the transformer and catch problems like arcing or aging insulation.
Condition monitoring systems help you keep transformers reliable and sustainable.
You can prevent unplanned outages by detecting issues early.
Data-driven decisions from these tests reduce downtime and improve grid reliability.
Utility companies see clear benefits from regular transformer testing. The table below highlights some of these advantages:
Benefit | Description |
|---|---|
Early Detection | Identifies insulation degradation early, allowing for proactive maintenance. |
Cost Savings | Prevents catastrophic failures and unplanned outages, minimizing downtime and associated costs. |
Improved Reliability | Enhances the overall reliability and stability of the power grid by safeguarding transformer assets. |
You play a key role in keeping the electrical grid safe and reliable. By following a thorough checklist, you help your team avoid costly repairs and keep the power flowing.
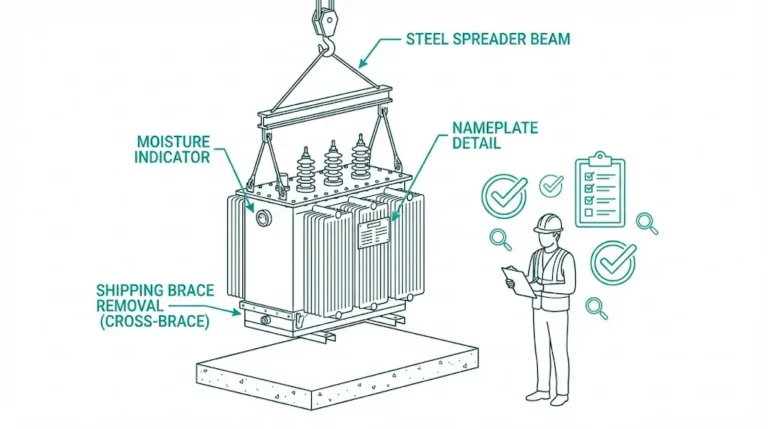
Before you start any distribution transformer testing, you need to prepare carefully. Good preparation helps you avoid mistakes and keeps you safe. You should always review important documents, follow safety rules, and gather the right tools.
You must check all relevant documents before you begin. This step helps you understand the transformer’s history and technical details. Reviewing documents also helps you plan your tests and spot any special requirements.
Start by reading the transformer’s nameplate. The nameplate gives you key information such as voltage ratings, current ratings, impedance, and serial number. You use this data to compare test results and confirm that the transformer matches its specifications. Always record the nameplate details in your test log.
Next, review the manufacturer’s specifications. These documents tell you about the design, materials, and recommended test procedures. They also list limits for test values. If you find any differences between the nameplate and the specs, note them for further investigation.
You should also check previous test results and installation records. The table below lists the essential documents and tests you need to review:
Essential Documentation and Tests |
|---|
Insulation resistance (megger) test |
Ratio, polarity, and winding resistance tests |
Grounding resistance and protection system verification |
Record installation details, test results, and commissioning data |
You must always put safety first. Transformers can be dangerous if you do not follow proper procedures. Take time to assess the site and wear the right protective gear.
Wear personal protective equipment (PPE) such as insulated gloves, safety glasses, and flame-resistant clothing. PPE protects you from electrical shocks, burns, and other hazards. Make sure your gear fits well and meets safety standards.
Walk around the site before you start. Look for hazards like wet surfaces, poor lighting, or obstacles. Check that the area is clear of unauthorized people. Confirm that all lockout and tagout procedures are in place. This step helps you avoid accidents and keeps your team safe.
Gather all tools and equipment before you begin testing. You need calibrated instruments such as insulation resistance testers, winding resistance meters, and turns ratio testers. Bring hand tools, cleaning supplies, and a camera for documentation. Check that all devices work properly and have valid calibration certificates.
Tip: Always double-check your equipment list before leaving for the site. Missing tools can delay your work and increase risk.

Visual inspection gives you the first clues about a transformer’s health. You can spot many problems before they become serious by looking closely at the unit and its parts. Always perform a visual check before you run any electrical tests.
You should walk around the transformer and look for any signs of physical damage. Pay attention to the tank, enclosure, and mounting hardware. Common indicators of trouble include:
Cracks or dents in the tank or enclosure
Rust or corrosion on metal surfaces
Loose or missing bolts and fasteners
Burn marks or discoloration near connectors
Tip: Use a flashlight to check hard-to-see areas. Take photos of any damage for your records.
Oil leaks can signal serious internal problems. You need to check all seams, gaskets, and fittings for signs of leakage. Look for:
Oil stains on the tank or ground
Wet spots around gaskets or bushings
Drips or puddles under the transformer
If you find oil leaks, record their location and size. Leaks can lead to insulation failure and overheating.
Note: Oil leaks, cracks, and corrosion are the most common visual indicators of transformer failure during external inspections.
You must inspect the core and windings if you have access. Follow these steps for a thorough check:
Perform a physical verification. Check the thickness of laminations, window height, and overall height. Record your readings and compare them with design values.
Run a core isolation test. Use an insulation resistance (IR) meter to check for shorts between the core and metal clamps. Make sure the IR values meet the required standards.
Measure the thickness and width of conductor strips. Verify the number of discs in each winding.
Measure winding resistance. Use the voltage drop method by injecting current and measuring the voltage drop across the winding.
These steps help you find problems like shorted turns, loose connections, or manufacturing defects.
Check the insulation on all windings and connections. Look for:
Discoloration or charring
Cracks or peeling
Signs of moisture or contamination
Good insulation keeps the transformer safe and reliable.
Inspect all bushings for cracks, chips, or contamination. Clean bushings help prevent flashovers and electrical faults. Replace any damaged bushings right away.
Check the cooling system for blockages, leaks, or broken fans. Make sure radiators and cooling fins are clean and free of debris. A working cooling system prevents overheating and extends transformer life.
Remember: Careful visual inspection helps you catch problems early and keeps your transformer running safely.
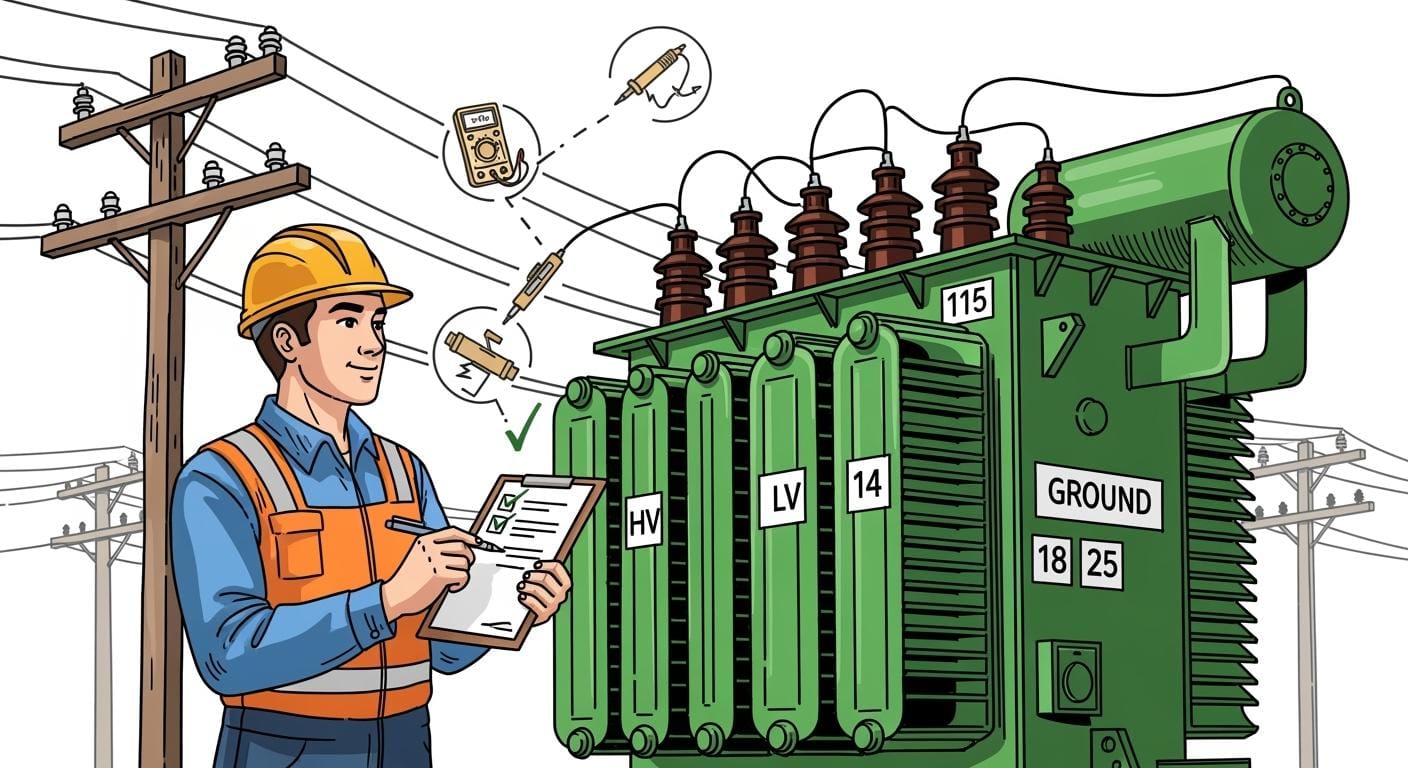
You start your electrical tests by measuring winding resistance. This test helps you find problems like loose connections, broken strands, or poor joints inside the transformer windings. You use a digital low-resistance ohmmeter (DLRO) or a similar instrument for this task.
To perform the test, first isolate the transformer from the power source. Connect the test leads to the transformer terminals. Inject a small DC current and measure the voltage drop across the winding. The instrument calculates the resistance using Ohm’s Law.
Steps for Winding Resistance Test:
Make sure the transformer is de-energized and grounded.
Connect the test leads to the correct winding terminals.
Allow the readings to stabilize before recording the value.
Compare your results with the manufacturer’s specifications.
Tip: Always test all windings—primary, secondary, and tertiary if present. Record the temperature, as resistance changes with temperature.
Abnormal resistance values can indicate issues such as shorted turns or loose connections. Early detection helps you prevent failures and maintain transformer reliability.
Insulation resistance testing, often called the “megger test,” checks the quality of insulation between windings and between windings and ground. You use a megohmmeter for this test. Good insulation keeps the transformer safe from electrical faults and moisture damage.
To conduct the test, disconnect all external connections from the transformer. Connect the megohmmeter between the winding and ground. Apply the test voltage (usually 500V, 1000V, or 2500V depending on the transformer rating) and read the resistance value.
Key Points for Insulation Resistance Test:
High resistance (in the range of hundreds of megaohms) means good insulation.
Low resistance may signal moisture, dirt, or insulation breakdown.
Always follow the manufacturer’s recommended test voltage.
Note: Record the temperature and humidity during the test. Insulation resistance drops as temperature and humidity rise.
You should perform this test as part of routine distribution transformer testing. It helps you spot insulation problems before they cause failures.
The turns ratio test checks the ratio of primary to secondary windings. This ratio determines the voltage transformation of the unit. You use a transformer turns ratio (TTR) tester for this check.
To run the test, connect the TTR tester to the primary and secondary windings. The tester applies a known voltage to one winding and measures the resulting voltage on the other. The device then calculates the ratio.
Turns Ratio Test Procedure:
Make sure the transformer is isolated and safe to test.
Connect the TTR tester as per the manufacturer’s instructions.
Measure the ratio for all winding combinations.
Compare the measured ratio to the nameplate value.
A correct turns ratio confirms that the transformer will deliver the expected voltage. A mismatch may indicate shorted turns, wrong connections, or manufacturing defects.
Remember: Always test all tap positions if the transformer has tap changers. This ensures proper operation across all settings.
These three tests—winding resistance, insulation resistance, and turns ratio—form the foundation of electrical checks during distribution transformer testing. They help you find hidden faults, confirm transformer health, and ensure safe operation.
You need to measure the load-loss of a transformer to understand its efficiency during operation. The load-loss test shows how much energy the transformer loses as heat when it carries its rated load. This test helps you evaluate the transformer’s voltage regulation and overall performance.
When you perform a load-loss test, you connect the transformer to a power source and apply the rated current to the windings. You measure the power loss that occurs due to the resistance in the windings. This loss is called “copper loss” because it mainly comes from the copper windings inside the transformer.
Why it matters: Load-loss testing is crucial for evaluating transformer efficiency. It identifies the total losses incurred when the transformer is under load. By assessing the heat generated from these losses, you gain essential insights into the transformer’s performance during real operating conditions.
Steps for Load-Loss Test:
Make sure the transformer is de-energized and isolated.
Connect the test equipment to the primary and secondary windings.
Apply the rated current and measure the voltage and power loss.
Record the results and compare them with the manufacturer’s specifications.
If you find higher-than-expected losses, you may have problems like poor connections, damaged windings, or design flaws. Early detection helps you plan maintenance and improve transformer efficiency.
You must check for leaks in transformer tanks and bushings to prevent oil loss and insulation failure. Leaks can lead to overheating, reduced dielectric strength, and even transformer failure.
You can use several methods to detect leaks:
Visual Inspections: Check mounting bolts and gaskets for proper compression and torque.
Infrared Inspections: Look for overheating bushings, which may signal loose connections.
Cleaning Methods: Clean surfaces regularly to prevent phase-to-ground faults and maintain insulation.
Power Factor Testing: Measure insulation quality and leakage currents.
You can also use specialized kits, such as the Duromar® Transformer Leak Arrest Kit. This kit seals leaks in energized transformers without shutting them down. It uses fast-curing polymers and ceramic-reinforced putty to fix leak-prone areas quickly.
Tip: Always record the location and size of any leaks you find. Address leaks right away to avoid bigger problems.
You need to test the dielectric strength of transformer insulation to ensure safety and reliability. Dielectric strength shows how well the insulation can withstand high voltages without breaking down.
For transformer oil, industry standards require a minimum dielectric strength of about 30 kV per millimeter. For high-voltage transformers, you should look for values of 50 kV per millimeter or higher. These values help prevent electrical breakdowns and keep the transformer safe during operation.
Key Points for Dielectric Strength Test:
Collect an oil sample from the transformer.
Use a dielectric strength tester to apply increasing voltage across the sample.
Record the voltage at which breakdown occurs.
Compare the result to the standard value.
Note: Low dielectric strength means the oil or insulation may be contaminated with moisture or particles. Replace or treat the oil if it does not meet the required standard.
Testing dielectric strength helps you catch insulation problems early and maintain safe transformer operation.
You need to check the PUL (Per Unit Leakage) specification when you test a distribution transformer. This value tells you how much impedance the transformer has compared to its rated value. Engineers often call this the “percentage impedance” or “%Z.” You find this number on the transformer nameplate. It plays a key role in how the transformer handles faults and shares load with other transformers.
PUL specification shows the ratio of the transformer’s leakage impedance to its base value. You usually see it as a percentage. For example, if a transformer has a 5% impedance, it means that at full load, the voltage drop across the transformer is 5% of the rated voltage.
Note: PUL specification helps you predict how much voltage will drop when the transformer carries its rated current. It also affects how much fault current will flow during a short circuit.
You must understand the PUL value for several reasons:
Short-Circuit Protection: A higher PUL value limits the fault current during a short circuit. This protects the transformer and downstream equipment.
Voltage Regulation: Lower PUL values give better voltage regulation. This means the voltage stays more stable when the load changes.
Parallel Operation: If you connect transformers in parallel, their PUL values must match closely. Mismatched values can cause uneven load sharing and overheating.
The table below shows how PUL affects transformer performance:
PUL Value (%) | Fault Current | Voltage Regulation | Parallel Operation |
|---|---|---|---|
Low (2-4%) | High | Good | Needs close match |
Medium (5-7%) | Moderate | Moderate | Easier to match |
High (8%+) | Low | Poor | May limit sharing |
You measure the PUL value by performing an impedance test, also called a short-circuit test. Here is how you do it:
De-energize and isolate the transformer.
Short the secondary winding.
Apply a low voltage to the primary winding.
Increase the voltage until the rated current flows in the windings.
Measure the voltage and current.
You calculate the impedance using this formula:
%Z = (Test Voltage / Rated Voltage) × 100
Tip: Always compare your measured PUL value with the nameplate value. If the measured value is much higher or lower, you may have winding damage or connection problems.
If your measured PUL matches the nameplate, the transformer is healthy. If the value is too high, you may have shorted turns or loose connections. If the value is too low, you might have a winding that is not connected or a manufacturing defect.
You should record the PUL value in your test report. This helps you track changes over time and plan maintenance.
Key Points to Remember:
PUL specification affects fault current, voltage regulation, and parallel operation.
Always test and verify the PUL value during routine transformer checks.
Use the results to ensure safe, reliable, and efficient transformer operation.
Remember: Accurate PUL testing helps you prevent failures and keeps your power system stable.

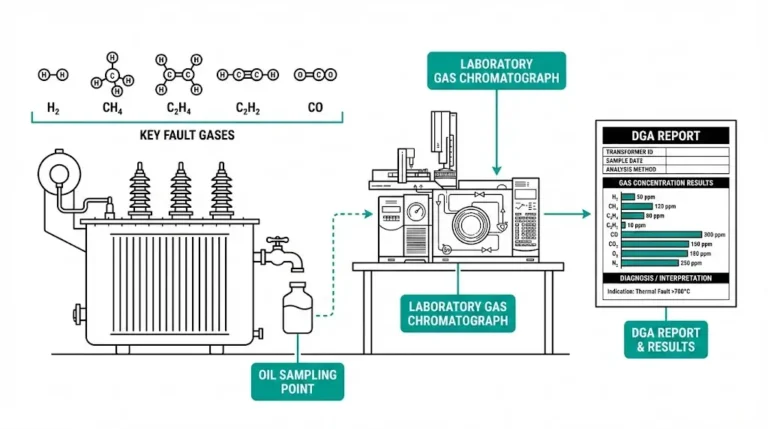
You need to check transformer oil during distribution transformer testing. Oil analysis helps you find hidden problems and keep your transformer safe. You look for gases, test the oil’s strength, and measure moisture. Each step gives you clues about the health of your transformer.
Dissolved gas analysis (DGA) tells you what is happening inside the transformer. When faults occur, gases form in the oil. You collect an oil sample and use special equipment to measure these gases. Each gas points to a different type of problem.
Here is a table showing common gases and what they mean for transformer health:
Gas | Indication of Transformer Health |
|---|---|
Hydrogen (H₂) | Shows partial discharge and electrical stress in insulation. |
Methane (CH₄) | Suggests localized overheating or poor circulation. |
Ethane (C₂H₆) | Points to low-temperature thermal breakdown of oil. |
Ethylene (C₂H₄) | Signals severe thermal faults, usually above 300°C. |
Acetylene (C₂H₂) | Indicates high-energy faults like arcing, above 700°C. |
Carbon monoxide (CO) | Comes from thermal breakdown of insulation materials. |
Carbon dioxide (CO₂) | Shows how much cellulose insulation has degraded. |
Tip: High levels of acetylene or ethylene mean you should act fast. These gases often signal serious faults.
You must test the dielectric strength of transformer oil to make sure it can insulate against high voltages. You use a breakdown voltage (BDV) tester for this job. The test shows how much voltage the oil can handle before it fails.
The minimum safe BDV value for transformer oil is 30 kV. This value stays the same for most voltage ratings, including 11 kV, 22 kV, and 132 kV systems.
IEC standards say transformer oil should never have a breakdown voltage below 30 kV.
If the oil fails this test, it may contain moisture or dirt. You need to clean or replace the oil to keep your transformer safe.
Note: Always record the BDV value in your test report. Low BDV means the oil cannot protect the transformer from electrical faults.
Moisture in transformer oil causes many problems. Water lowers the oil’s ability to insulate. It also weakens the paper insulation inside the transformer.
Moisture reduces the dielectric properties of the oil. This makes insulation less effective.
High water content breaks down the mechanical strength of cellulose insulation. This raises the risk of breakdown.
Water molecules split cellulose chains. This process speeds up insulation damage and shortens transformer life.
You use a moisture meter to check water levels in the oil. If you find too much moisture, you need to dry the oil or replace it. Keeping moisture low helps your transformer last longer.
Remember: Regular oil analysis helps you catch problems early. You protect your transformer and keep your power system reliable.
You must check the functional and safety systems of a distribution transformer before you return it to service. These checks help you confirm that the transformer will protect itself and the network during faults or abnormal conditions. You focus on protection devices, grounding, and alarm systems.
Protection devices act as the first line of defense for your transformer. They detect faults and disconnect the transformer from the grid to prevent damage.
Fuses protect the transformer from overcurrent and short circuits. You should inspect each fuse for signs of wear, corrosion, or physical damage. Replace any fuse that looks damaged or has blown. Always use the correct fuse rating as specified by the manufacturer. Test the continuity of each fuse with a multimeter to confirm it will operate when needed.
Tip: Keep spare fuses on hand. Quick replacement reduces downtime during emergencies.
Relays sense abnormal conditions and trigger protective actions. You need to check that each relay operates as designed. Test the relay by simulating fault conditions and observing its response. Confirm that the relay trips the circuit breaker or sends an alarm signal. Review the relay settings and compare them with the recommended values. Adjust the settings if you find any differences.
Proper grounding keeps your transformer safe from electrical faults. It directs fault currents safely into the earth, protecting both equipment and people.
You must measure the resistance of the grounding system to ensure it meets safety standards. Several methods help you do this:
Fall-of-Potential Method: Place test stakes in the ground. Inject current and measure the voltage drop to calculate resistance.
Clamp-On Method: Use a clamp-on meter to measure resistance without disconnecting the ground. This method works well for systems already in service.
Three-Point Method: Use three test stakes at different distances to measure resistance accurately.
You should record the measured resistance and compare it to the standard limit, usually less than 1 ohm for substations. High resistance may signal poor connections or soil problems.
Alarms and trip mechanisms alert you to problems and disconnect the transformer if needed. You must verify that these systems work correctly.
Trip Circuit Supervision (TCS) relays monitor the trip circuit for faults at all times.
Alarms activate if the TCS relay detects issues like open circuits, supply failures, or under-voltage.
The TCS relay works whether the circuit breaker is ON or OFF, ensuring continuous protection.
Test each alarm and trip function by simulating fault conditions. Confirm that alarms sound and that the transformer disconnects when required. Record your results for future reference.
Remember: Regular functional and safety checks help you catch problems early and keep your transformer operating safely.
You should always record your test results in a clear and organized way. Accurate records help you track the condition of each transformer over time. Use a standard test log or digital form to write down all measurements, observations, and any unusual findings. Include the date, location, and the names of the people who performed the tests. Attach photos of any damage or issues you find during inspections. Good documentation makes it easier to compare results from different tests and spot trends that could signal future problems.
Tip: Keep your records in both digital and paper formats. This practice ensures you have a backup if one set is lost.
You must follow international standards when you document your transformer tests. These standards help you prove that your work meets safety and quality requirements. Always reference the correct standards for each type of test and for your documentation process. The table below shows some important standards you should know:
Standard | Description |
|---|---|
IEC / EN 61558 | Inspection standard for electrical safety in transformers. |
European Norms Electrical Certification (ENEC) | Certification mark indicating compliance with European safety standards. |
When you follow these standards, you help your company pass audits and meet legal requirements. You also make it easier for others to understand your test results.
After you finish distribution transformer testing, you should give clear maintenance recommendations. These steps help keep the transformer safe and reliable. Here are some common actions you should suggest:
Tighten all electrical connections to prevent failures.
Check that protection devices work correctly and can handle faults.
Monitor transformer loads to avoid overloading and early aging.
Conduct routine inspections for wear, oil leaks, and corrosion.
Assess transformer oil for moisture, acidity, and dielectric strength.
Clean, lubricate, and control moisture to maintain performance.
Use advanced tests like Dissolved Gas Analysis and Thermal Imaging to find hidden issues.
Inspect bushings for cracks and keep them clean.
Make sure cooling systems work to prevent overheating.
Use silica gel breathers to keep moisture out of the transformer.
Note: Regular maintenance based on your test results will extend the life of the transformer and reduce the risk of unexpected failures.
When you test a distribution transformer, you may find results that do not match the expected values. These abnormal results can point to hidden problems inside the transformer. You should always act quickly when you see something unusual. The table below shows some of the most frequent abnormal results and what you should do about them:
Abnormal Result | Recommended Action |
|---|---|
Loose or corroded connections | Inspect and tighten connections |
Insulation defects | Perform insulation resistance testing |
Temperature related defects | Monitor temperature and improve cooling systems |
Moisture ingress | Implement moisture control measures |
Contamination | Clean and replace contaminated components |
Interturn shorts | Conduct further electrical testing |
Increased losses | Analyze and rectify losses |
Bushing faults | Inspect and replace faulty bushings |
Insulation aging | Assess insulation condition and replace if necessary |
Mechanical deformation | Evaluate structural integrity and repair as needed |
Tip: When you find abnormal results, generate a report to track performance changes. Use diagnostic tools to check how serious the problem is. Try to find the exact location of the fault and decide if you need to limit transformer operation.
You will often see the same types of faults during routine transformer testing. Knowing these common issues helps you spot trouble early and take action. The table below lists the main causes of transformer failure and how often they occur:
Cause of Failure | Number of Failures |
|---|---|
Insulation failure | 92 |
Overloading | 30 |
Line surge | 70 |
Moisture | 21 |
Oil contamination | 20 |
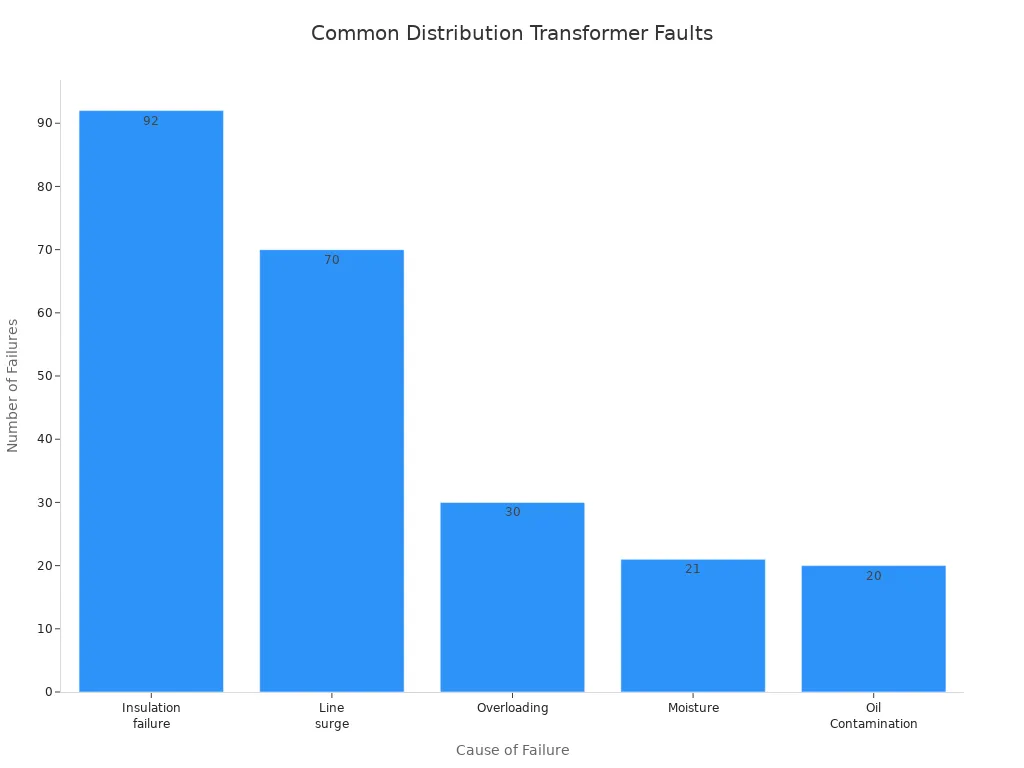
Insulation failure is the most common problem you will face. Overloading and line surges also cause many failures. Moisture and oil contamination can weaken insulation and lead to breakdowns. You should always check for these issues during your tests.
If you find a problem during testing, you need to retest the transformer after making repairs or adjustments. Good retesting practices help you confirm that the transformer is safe and ready for service. Follow these guidelines:
Keep a detailed history of all test results and transformer performance. This record helps you make better decisions in the future.
Test major electrical equipment before the warranty ends. This step helps you catch and fix problems early.
Use health monitoring devices to track key parameters like insulation quality and moisture content.
Regularly use diagnostic tools such as dissolved gas analysis and partial discharge measurement. These tools help you spot hidden faults and plan maintenance.
Note: Careful retesting and record-keeping help you maintain safe and reliable transformers. Always follow a step-by-step approach to troubleshooting and retesting.
You should always follow a clear test sequence during distribution transformer testing. This approach helps you avoid missing important steps and keeps your work organized. Start with visual inspections. Move on to electrical tests. Finish with oil analysis and functional checks. You can use a checklist to track your progress.
Recommended Test Sequence:
Visual inspection of external and internal components
Electrical tests (winding resistance, insulation resistance, turns ratio)
Oil analysis (dissolved gas, dielectric strength, moisture content)
Functional and safety checks (protection devices, grounding, alarms)
Tip: Stick to the same sequence every time. You will catch problems early and reduce the risk of errors.
You need accurate results for every test. Calibrated equipment gives you reliable data. Before you start, check the calibration certificates for all your instruments. Look at the date and make sure the equipment meets the required standards. If you find expired certificates, send the equipment for calibration.
Calibration Checklist Table:
Equipment | Calibration Interval | Action Required |
|---|---|---|
Insulation Resistance Meter | Every 6 months | Verify certificate |
Winding Resistance Meter | Every 12 months | Check accuracy |
Turns Ratio Tester | Every 12 months | Confirm calibration |
Oil BDV Tester | Every 6 months | Inspect and calibrate |
Note: You should never use uncalibrated equipment. Inaccurate readings can lead to wrong decisions and unsafe conditions.
Good team coordination makes distribution transformer testing safer and more efficient. Assign clear roles to each team member. Communicate your plan before you begin. Hold a safety briefing and review the checklist together. Use radios or mobile phones to stay in touch during testing.
Team Coordination Tips:
Assign one person to record results
Designate a safety officer to monitor hazards
Make sure everyone knows the test sequence
Share updates and findings with the whole team
🛡️ Safety improves when everyone understands their responsibilities. You reduce mistakes and finish testing faster.
You can improve your results by following these best practices. You will keep your team safe, get accurate data, and maintain reliable transformers.
You gain real value when you follow a systematic approach to distribution transformer testing. This process helps you keep transformers reliable, safe, and compliant with industry standards. By staying updated on best practices, you protect your equipment and your team. Keep learning and always follow the latest guidelines. Your commitment to quality testing supports a stronger, safer power grid.
You should always check insulation resistance first. This test helps you find moisture or breakdowns in insulation. Good insulation keeps your transformer safe and reliable.
You should test transformers at least once a year. If you see problems or the transformer works in harsh conditions, test more often.
Oil analysis helps you find hidden faults. You can detect overheating, arcing, or moisture. Clean oil protects the transformer from electrical failures.
Act quickly. Record the leak’s location and size. Fix the leak and check the oil level. Leaks can cause insulation failure and overheating.
No, you must de-energize the transformer before most tests. This keeps you safe and prevents damage to your equipment.
A low value means the oil or insulation may have moisture or dirt. You should clean or replace the oil to keep the transformer safe.
Look for cracks, chips, or contamination. If you see damage, replace the bushing right away. Damaged bushings can cause electrical faults.